You've probably asked yourself the following question if you're a new website user. Is adding a blog to my website really as beneficial as it seems?
- Blogging aids in the promotion of your company.
- Writing on a regular basis will help you develop yourself as a reliable source in your field.
- Using your blog to add daily content to your website gives Google more sites to list in the search engine results pages, making it easier for your target audience to find you.
- As visitors read your blog, they stay longer on your site and are more engaged with your material.
Blogging is a fantastic way to improve the overall content of your WordPress site. This post is for you if you're wondering how to add a blog to your website.
This fast guide will walk you through the steps to create a separate blog area on your new WordPress website.
Contents
1 5 easy steps for adding a blog to your WordPress site
1.1 1. Create a home and blog page
1.2 2. Navigate to the Reading setting
1.2.1 Customize your “Reading” settings
1.3 3. Customize your blog settings
1.4 4. Add your blog page to your main navigation menu
1.5 5. Write your first blog post
2 Ready to Add Your Blog to WordPress?
2.1 Related
5 easy steps for adding a blog to your WordPress site
WordPress displays your blog posts on your home page by default. You don't need to build separate pages if you just want to run a blog, and you can start writing blog posts right away.
However, if you want to make a separate home page with a link to your blog, follow these five simple steps:
As previously mentioned, WordPress displays your blog posts on the first page by default. To change it to the new home page you just made, click the circle next to "A static page" and choose the new home page you just made as to the homepage. The next step is to choose your "Posts list." From the drop-down menu, choose the new blog page you just made. These activities would inform WordPress that a separate home page and blog page are desired.
You are not required to build secondary pages beneath your new blog page, but you can do so if you wish. It's as simple as dragging and dropping new pages into any desired order or under any desired main page.
- In WordPress, build a new home page and a blog page.
- Go to "Settings" and choose "Reading."
- In the “Reading” area, you can customize your blog settings.
- Have a link to your new blog page in your primary navigation menu.
- Create your first post and publish it. Let's take a closer look at these five measures.
1. Create a home and blog page
The first step in creating the separate home and blog pages is to go to your website's "Pages" section. This section can be found by going to the left WordPress dashboard and clicking on "Pages" in the navigation bar.
You'll use this page to build and publish two separate pages: your home page and your blog page. To create your home page, click "Add New," name it "Home," and fill it with any related material. When you've done adding content, click the "Publish" button in the top right corner of the page.
You don't have to absolutely fill out your home page just yet if you don't want to. You can always return later and change the look, sound, and material. It's crucial that you build a new static home page for your website.
The next step is to build your blog page. To do so, click "Add New," name your page "Blog," and then "Publish."
2. Navigate to the Reading setting
After you've built a home page and a blog page, go to the "Settings" section and find the "Reading" section.
On the left dashboard, you'll find "Settings." WordPress can show another menu if you hover your cursor over "Settings." Choose "Reading" from the drop-down menu.
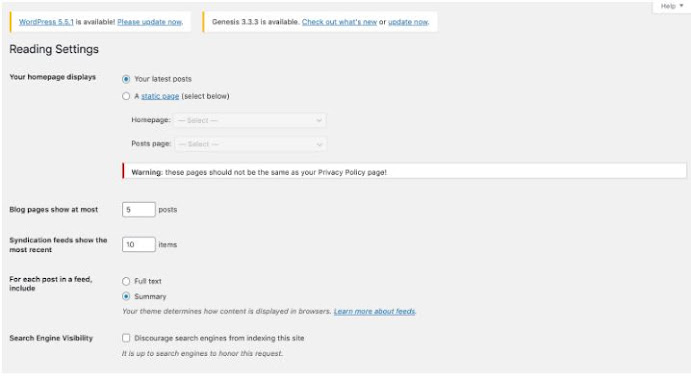
WordPress will take you to the following page after you click "Reading."
As previously mentioned, WordPress displays your blog posts on the first page by default. To change it to the new home page you just made, click the circle next to "A static page" and choose the new home page you just made as to the homepage. The next step is to choose your "Posts list." From the drop-down menu, choose the new blog page you just made. These activities would inform WordPress that a separate home page and blog page are desired.
3. Customize your blog settings
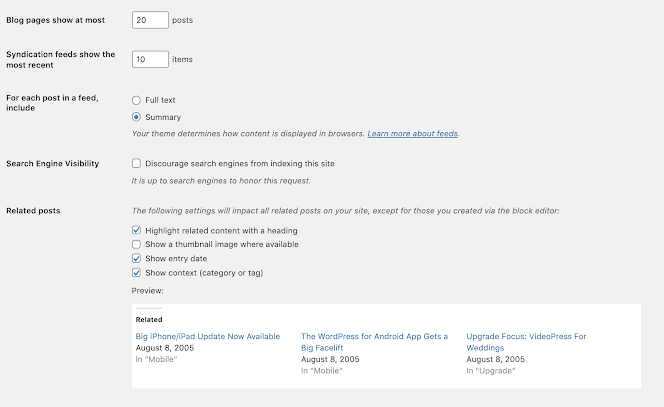
If you keep scrolling down the Reading page in WordPress, you'll find that you can customize the settings for your blog posts.
You may choose how many blog posts WordPress should display and how many syndication feeds should display. You may also choose whether your full text or a description should appear on the blog page, as well as how your relevant post features should appear.
When you've finished customizing your options, scroll to the bottom of the page and click "Save changes."
4. Add your blog page to your main navigation menu
When you save your changes, instead of your blog posts, your new static home page will appear when you type in your URL.
What you won't see right now is a direct connection to your blog in your primary navigation bar. To get the most out of getting a blog on your website, you should make it easy for visitors to find it. As a result, a link to your blog should be added to your main navigation menu. Here's how to do it.
Go to the left dashboard and look for the word "Appearance." WordPress can bring you a new menu if you hover your cursor over "Appearance." Choose "Menus" from the drop-down menu.
You'll see a box where you can add a page to your menu when you get to the "Menus" page. The good news is that WordPress will assist you by displaying a list of your most recently produced articles.
You can add “Blog” to your menu by selecting it from your pages and clicking “Add to Menu.”
Keep in mind that the name of your post will also be the name of your connection, so keep it short and sweet. I suggest "blog," "updates," or "news."
👉Also, you can read: WPBeginner Users Get a Free Domain and 62% off HostGator Web Hosting
When you click "Add to Menu," WordPress will add the page to the right-hand "Menu Structure" content block. You'll notice that "Blog" has moved to the bottom of my menu.
You can drag and drop the various pages/menu items (for example, your new blog page) and arrange them on your menu in any order you want.
Note: The navigation menu from my travel blog is seen in the screenshot above. You'll find that my menu has some extra pages and that some sub-pages are indented under the main pages. There are sub-menus or sub-menus that appear underneath the main menu item.
When someone hovers their cursor over "About" on my navigation menu, they will see the three secondary menu items I added.
5. Write your first blog post
You're ready to write your first post once you've set up your static home page and added your latest blog page to your menu.
To make a new article, go to your dashboard's "Posts" section, select "Add New," start typing, and publish when you're done. If you're unsure how to get started with your first blog post, here are some helpful hints.
Ready to Add Your Blog to WordPress?
There's a reason WordPress is the most popular content management system. Starting a blog or creating a static home page with a blog connection in your primary navigation menu is simple with WordPress.
You can create your brand, start producing useful content, and maintain a flourishing website by following a few simple steps.
Visit HostGator for more details about how to get started with WordPress and to see our affordable WordPress hosting options.


No comments:
Post a Comment